Then go to STEP 4: INSTALLING THE VINYL DOME
G. If the difference in your longest measurement across the side of your oval pool to the shortest measurement is more that two (2") you will have to adjust rafter lengths. To trim accurately, you must figure the difference between the longest measurement and the shorter measurement of the rafter sets you are installing.
Remember: You have already written down all of your measurements and the longest measurement is your standard. Go to your numbering of the vertical supports. #1 is the longest, #2 is the next, #3 the next and so on.
Subtract the shorter measurement from the longest measurement (point #1) and the divide by 2. This measurement is the amount of rafter that will be cut off each side of the rafter set. See Figure 11, page 10.
Example: Let's say your longest measurement, Point #1 is 193". The next point, Point #2 is 190".
Point #1 - 193"
Point #2 - 190"
Difference: 3" divide 2 = 1 1/2
1 1/2" must be cut off of the rafter closest to the RBJ on each side of the rafter set.
Point #1 - 193"
Point #3 - 190 1/2"
Difference: 3 1/2"divide 2 = 1 3/4" to be cut from
the rafter closest to the RBJ on each side of that rafter set.
And so on.
Be sure to deburr inside of the rafters after they have been cut.
CAUTION!!!
If you do trim rafters, each rafter MUST
BE MARKED with the vertical support number according to your
pool measurement diagram on page 5, so that you will remember where each
rafter set goes for future installations.
Go on to Step 5.
STEP 4: INSTALLING THE VINYL DOME (OVAL POOL)
A. If you have the space, spread out the vinyl dome on the ground near the pool and allow the sun to warm the vinyl dome. When you are ready to put the vinyl dome up on the frame, position the vinyl dome along the length of the pool, with the door on the end where it will be located on the frame and the window zippers are to the outside of the cover. You will need additional help, one or two more persons depending on the length of your pool, to help pull the vinyl dome onto and over the rafters.
B. Thread the 3/16" polypropylene line through two or three grommets in the center of the outer seam of the vinyl dome on one side and knot it it securely. Make sure the window zippers are to the outside of the cover or you will put it on upside down.
C. Walk the other end of the 3/16" polypropylene line around to the other side of the pool and over the center of the Ridge Beam. Slowly pull the vinyl dome up to the center of the Ridge Beam. You will need to locate people at each curved point on the side of the pool where the cover is located. They will assist in raising the vinyl cover up onto the rafters equally all along the length. Then have someone "fluff" the remaining portion of the cover, as you would a bed sheet, while continuing to slowly pull the cover over the top. Additional people should be located around the opposite side of the pool to assist in lifting and feeding the vinyl down the other side. See Figure 14
D. Once the vinyl dome has been pulled over the rafters, adjust the dome so that the seams of the vinyl are as near as possible to the rafters. You can have someone "fluff" the remaining portion of the cover, as you would a bed sheet to ease in the adjustment of the cover on the rafters.
E. Gently pull the vinyl dome down over the pool ledge all around the pool.
Go on to Step 5.
STEP 5: TIE DOWN THE SUN DOME
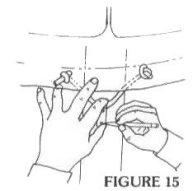
A. Located in the vinyl dome carton are the neoprene cords used in the tie down of the dome.
B. Tie a knot 1 to 2 inches from one of the ends of the cord.
C. Thread the untied end of the cord through
one side of the two grommets located on the hem just below each mounting
bracket and then tie a knot in the untied end. See Figure 15.
D. Repeat at each rafter location around
the pool.
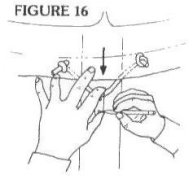
E. Place a tiedown hook over the neoprene
cord at one of the rafter locations. Pull the hook down to at least
3" of tension and mark for holes to be drilled on the vertical support
to mount the tiedown hook. See Figure 16.