General Instructions for Patching a Swimming Pool Dome
Note: Most dome repair materials and supplies can be found HERE.
1. Small Repairs:
When repairing a rip or tear in the membrane, duct tape the rip together on the inside of the dome to bring it back together. Clean off the rip outside of the dome with some warm soapy water or rubbing alcohol. Wipe dry. Cut a patch from a piece of repair vinyl. It should be a couple inches larger than the rip. Round the corners of the patch. Apply the HH-66 adhesive to the patch as if you were painting on a medium layer of paint on a wall. Apply a similar amount to the dome in the area where the patch is to be applied. If the adhesive is not setting quickly enough, use a hair dryer or heat gun to speed up the process. Squeegee with a clean rag.
Next, remove the duct tape from the inside and complete the same procedure to clean and patch the dome from the inside also.
2. Hem/Base Repairs:
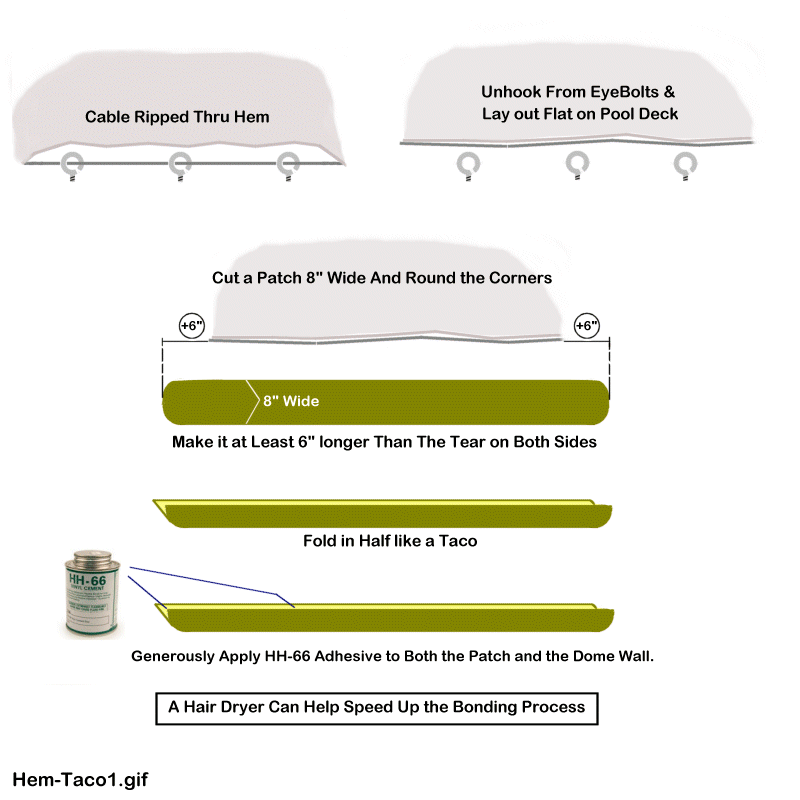
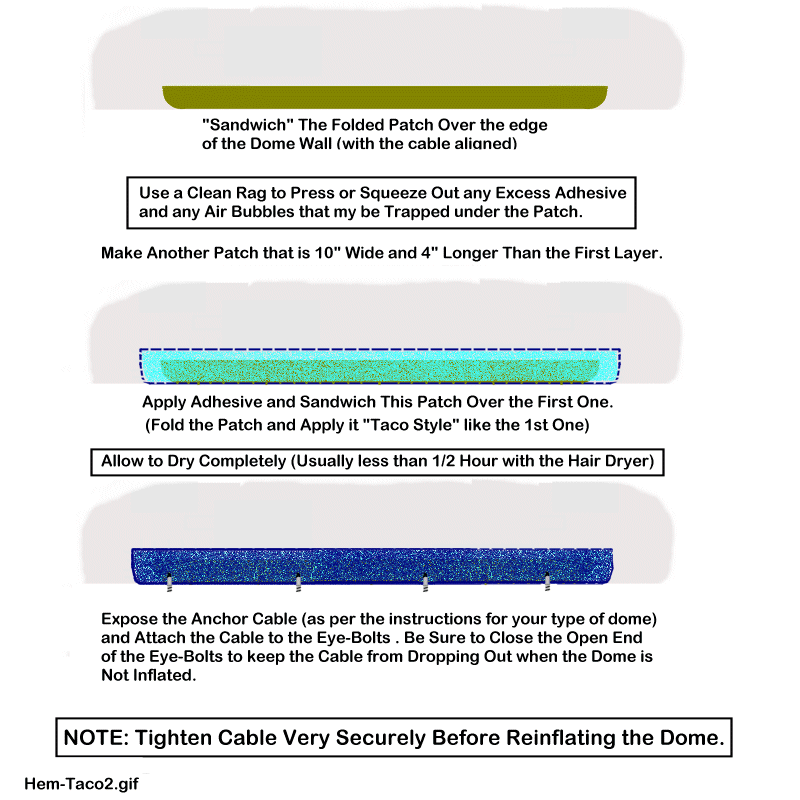
To repair a rip in the hem, use the method shown in the"Hem-Taco" diagrams below.


3. Cable Repairs:
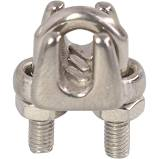
To repair the sheared cable, use a 1' or so piece of cable (can be obtained from excess at the entry locations) or you can purchase some at Home Depot or Lowes. It's a 1/8" steel cable with a 3/16" plastic coating. Peel back the hem far enough to expose the area to be repaired. Use a couple of cable clamps (similar to the ones used to secure the airlock cables) and splice the new piece of cable to the dome cable.

After splicing, by using the "Hem-Taco" method (see #2 above) clean-up and reinforce the area where the cable has been spliced.
4. Large Repairs:
These instructions are based on making LARGE repairs in the wall of a dome, generally in the area of a dome corner. This, is due to the fact that most damage resulting from high winds occurs in one corner of the dome. On occasion this damage will protrude into the top of the dome. We have yet to explain this phenomenon except that we do know that when a high gust of wind hits one end of the dome, it can force a large volume of air to the opposite end and a "corner blowout" is sometimes the result.
If the tear in your dome is not in a corner, pick out the parts of these instructions that apply to your particular situation and apply those parts. That, combined with patience and good judgment will allow you to make a neat and efficient repair.
Tools Required
|
Phase One
STEP 1: If the dome is inflated, place the sheet of plywood inside the dome so that when the dome is deflated the damaged portion of the dome will fall on the plywood.
If the dome is deflated, unhook the cable from the eye bolts in the area of the damage and slide the sheet of plywood under the dome so that the damaged area is laying on top of the plywood.
STEP 2: If the damage extends into the top of the dome, you want to repair this area first. Arrange as much as possible of the blue, white or aqua portion of the dome so that it is laying flat on the plywood and the torn edges are aligned. Placing a small, round table on top of the plywood, and aligning this table to the edge of the top of the dome (where the clear material meets the top of the dome) will allow your to get virtually all of the damaged area in the dome top laying flat at the same time. This will allow the dome top to lay flat while the clear material drapes down over the edges of the table. The table should be at least 3' to 4' diameter.
STEP 3: Working from the top side of the dome, open up the torn edges and wipe the underside of the dome clean and dry on each side of the torn edges of the material.
STEP 4: Again, working from the outside, cut 3" to 6" pieces of duct tape and slide them under the edges of the area you are working on and tape the torn edges together from the underside of the material. Care must be taken to align and butt the material together like pieces of a jigsaw puzzle. Properly done, you should see only a hairline crack once the material is taped together. DO NOT attempt to tape material together that you cannot get to lay flat. This type of repair must be done in stages. It cannot all be done at the same time so PATIENCE is the operative word.
STEP 5: Now that you have an area aligned and taped together, clean the top side of the area to be patched with rubbing alcohol.
STEP 6: Cut a patch that will fit over the area you have taped together and that will overlap about 2" on the end of the tear and that is about 4" wide. See below.
Note: All areas of patch are curved except end where next patch begins. If the patching is to be continued into a second phase, the end where the next patch will begin should be left square (straight line) so that the following patch can butt against the previous patch. If no patching will continue beyond that point, the end should be rounded and go approx. 2" beyond the torn area (dotted line).
STEP 7: Overlay the patch on to the torn area you are about to repair and trace the outline of the patch on the dome material with a ball point pen.
STEP 8: Brush the vinyl cement on to the dome over the area you outlined in step 7.
STEP 9: Brush the vinyl cement on to the patch you cut in step 6. Allow the vinyl cement to air dry to where it is tacky and cloudy.
STEP 10: Being careful with alignment, apply the patch to the dome using the lines you have scribed on the dome as guides. The cement sticks immediately on contact so, again, alignment of the patch is most critical!
STEP 11: Knead the patch in all areas with your thumb to insure adhesion making sure all air bubbles are worked out.
STEP 12: Lay a small piece(s) of plywood on top of the patch then place a five gallon bucket(s) of water on top of the plywood to "clamp" the patch down.
You have now completed phase one of the project. It is necessary to allow the patch to cure a minimum of four hours. Overnight is better. Allow the patch to cure properly prior to going to phase two.
Phase Two
You now have one area of the damage repaired. Remove the 5 gallon bucket(s) and the small pieces of plywood. Rearrange the dome to get another damaged area laying flat on the 4 x 8 sheet of plywood or the table. Repeat steps 3 through 12 on each area you are able to get laying flat, butting each subsequent patch against the previous patch until all torn areas in the top of the dome are repaired.
Once all damaged areas in the top of the dome are repaired, you can start repairs on the clear wall using the same procedures outlined above. If you have placed a table inside the dome you may remove it prior to repairing the clear material and work directly on the 4 x 8 piece of plywood. The number of stages will be determined by circumstances, but each stage is a repetition of the previous stage.
Generally speaking, larger repairs can be made in the dome wall simply because you can get a larger portion of material laying flat at the same time and at a single positioning. But remember, if you cannot get it flat, repair what you can, allow that repair to cure, then re-arrange the material. AND, don't try to repair a larger area than can be glued prior to the glue setting up. On larger, longer patches, it is advisable to apply the glue to smaller portions (9" to 12" at a time), stick that portion of the patch down, then proceed to the next portion of the patch.
Also, please remember that patience is the most important tool on the list. Properly done and once the dome is fully repaired, you will have a repair that will last indefinitely and you will be surprised at how un-noticeable the repair.
Once everything is patched back together you may have spent an hour once or twice a day over a two or three day time frame but your dome will be good as new. Remove the plywood and other miscellaneous tools, hook up the cable, inflate the dome, check the pressure switch to make sure the blower is cycling and marvel at your accomplishment. Ten or fifteen years from now, you will completely forget that you had to do this.
By the way, instructions like this are difficult to write as there are so many variables, so try to read between the lines to fit your situation. If you still have questions, our phone number is below.
Need More Help?
Please don't hesitate to contact us online or call us at 1-800-982-6966 for additional tech support.
Return to Dome Main Page - See Additional Dome Resources