NOTE: The rafter does not have to be fully against the center ring of the spider or RBJ to hold.
NOTE: The rafter tubing comes in matched sets. The Ridge Beam tubing should be what is left after you have put together all of the rafter sets. Check your illustrated parts list packed in frame carton #1 for quantities and measurements. For example, you will have only two short lengths of rafter tubing to attach to the two half spiders, plus any number of long lengths to fit between the Ridge Beam Joiners (RBJ), depending on the length of your pool.
B. At each short-tube end of the Ridge Beam, insert the single prong side of the half spider. Then insert two complete rafter assemblies on the two center spokes of the curved side of the half spiders on each end.
Helpful tip: Taping each joining point of the rafter set and where the tubing joins to the castings, with silver duct tape, will make it much easier to install and prevent the assembly from twisting or coming apart while you install them.
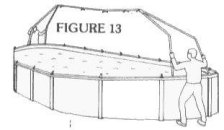
C. With one person holding each rafter end
and pushing towards the spider, carefully lift and walk the Ridge Beam
assembly over the pool at the longest measurement. Place the
rafters in the mounting brackets. See Figure 13.
NOTE: The rafter does not have to be fully
against the center ring of the spider or RBJ to hold.
D. Once the four rafters have been placed into the mounting brackets, the Ridge assembly will stand by itselft. The sag in the middle will disappear as you install the remaining rafters.
E. Install the remaining rafters. If the difference in your longest measurement across the sides of your oval pool to the shortest measurement is less than two (2") you will not have to adjust any rafter lengths. If you do have to adjust rafters go to Item G
F. Finish installing the remaining rafters.
Then go to STEP 4: INSTALLING THE VINYL DOME
G. If the difference in your longest measurement across the side of your oval pool to the shortest measurement is more that two (2") you will have to adjust rafter lengths. To trim accurately, you must figure the difference between the longest measurement and the shorter measurement of the rafter sets you are installing.
Remember: You have already written down all of your measurements and the longest measurement is your standard. Go to your numbering of the vertical supports. #1 is the longest, #2 is the next, #3 the next and so on.
Subtract the shorter measurement from the longest measurement (point #1) and the divide by 2. This measurement is the amount of rafter that will be cut off each side of the rafter set. See Figure 11, page 10.
Example: Let's say your longest measurement, Point #1 is 193". The next point, Point #2 is 190".
Point #1 - 193"
Point #2 - 190"
Difference: 3" divide 2 = 1 1/2
1 1/2" must be cut off of the rafter closest to the RBJ on each side of the rafter set.
Point #1 - 193"
Point #3 - 190 1/2"
Difference: 3 1/2"divide 2 = 1 3/4" to be cut from
the rafter closest to the RBJ on each side of that rafter set.
And so on.
Be sure to deburr inside of the rafters after they have been cut.
CAUTION!!!
Then go on to STEP 4: INSTALLING THE VINYL DOME
STEP 4: INSTALLING THE VINYL DOME (ROUND POOL)
A. If you have the space, spread out the vinyl dome on the ground near the pool and allow the sun to warm the vinyl dome. When you are ready to put the vinyl dome up on the frame, position the vinyl dome so that the door is close to where it will be located on the frame and the window zippers are to the outside of the cover.
B. Thread the 3/16" polypropylene line through two or three grommets in the outer seam of the vinyl dome on the side opposite the doorway and knot it securely.
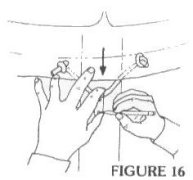
C. Walk the other end of the 3/16" polypropylene line around to the other side of the pool and over the center spider. Slowly pull the vinyl dome up to the center spider and then have someone "fluff" the remaining portion of the cover, as you would a bed sheet, while continuing to slowly pull the cover over the top. Additional persons should be located around the pool to assist in lifting and feeding the vinyl from one side to the other. See Figure 16.
CAUTION!!!
E. Gently pull the vinyl dome down over the
pool ledge all around the pool.
| NEXT PAGE | MAIN PAGE |